Import custom file format
WinSplits Pro can import files from the most common event administration systems. However, often it can happen that you want to import split times that are saved in a format that is not supported. In that case, use the Import custom file format dialogue, which consists of four steps which can be accessed via File > Import custom file format. At the bottom of this page there is an example of how to import split times using the dialogue. The dialogue's four steps:
- Raw data. Paste in the split times that you need to import here. You can import one or several classes at a time.
- Enter event data and the headers. Colour-code the cells that indicate where the first class and the first runner begin. These cells are called headers, and it is important that they are marked correctly in order for the import to work properly.
- Enter class and runner data. Colour-code the cells that contain certain information for the class (for example, class name, course length) and for the runner (runner's name, club, split times) that is shown.
- Preview. Here you can see a preview of how the cell contents will be interpreted during importation. Go back and make corrections as necessary.
Instructions for what needs to be done in each of the four steps are given at the top of the window. It may be useful to make certain changes to the raw data, either in the large text box in step 1 or in a separate text editor, in order to get good final results.
Example
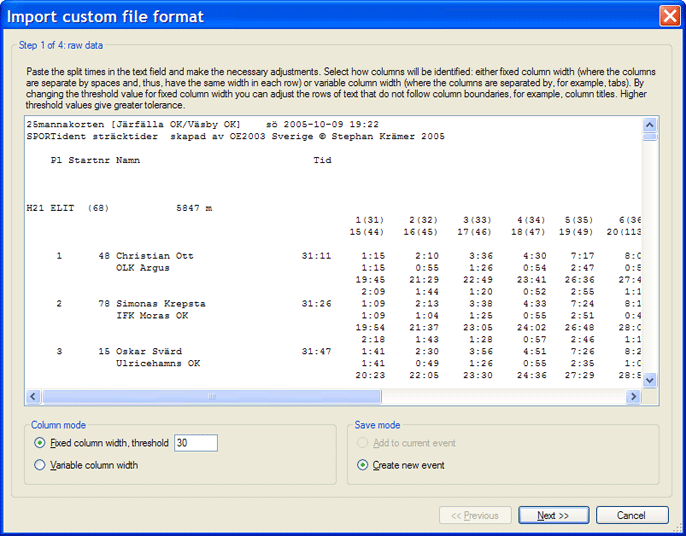
Step 1: raw data
You want to import these split times that you found on the internet. Start by selecting the split times in the web browser and copying them (Ctrl+C should work). Start the import dialogue in WinSplits Pro via File > Import custom file format. Paste split times into the large text box in step 1 using Ctrl+V. Then select column type:
- Fixed column width. Used if the columns that the split times are placed into are separated with spaces. The threshold value controls how rows of text that do not follow the column borders, such as the title row, are managed. The higher the threshold value, the greater the tolerance, meaning that fewer columns will be identified.
- Variable column width. Used if the columns are separated by, for example, a tab or semicolon.
In this example the columns are separated with spaces, so Fixed column width is used, and the threshold is set to 30. You can then choose to save the split times in a new event or in the current event (which can only be chosen if an event is currently open). Proceed to the next step by clicking Next.
Step 2: enter event data and headers
Start by checking that the contents have been appropriately divided into cells. Go back and make adjustments as necessary.
Now it is time to colour-code the class and runner headers. A header consists of one or several cells whose type of contents uniquely defines the row where class or runner data begins. The following cell types exist:
- Text cells contain at least one letter. Class, club, and runner names are examples of text cells.
- Numerical cells contain only number and punctuation marks, such as period, comma, or parentheses. Cells containing times are examples of numerical cells.
- Blank cells have no visible contents.
In this example, the class header consists of the text cell "H21" in the first column. The dialogus will interpret each row that begins with a text cell as a the beginning of a new class. If only one class is to be imported, you do not need to provide a class header.
The runner header consists, in this case, of two text cells: runner's name and club name. Accordingly, the dialogue will interpret each row that has a text cell in the fourth column and a text cell in the same column one row below as the beginning of a new runner's data. In some cases, you may need to include blank cells or cells with split times in the header in order to get the data for all the runners. In some trickier situations, you may have to simply experiment a bit with the headers to get it right.
Classification is done with the help of the colour-coding that is shown on the right. Classify a cell by clicking on it and then pressing the key that corresponds to the cell's classification (for example, 2 for the first runner's header). The cell is then coloured with the colour of the corresponding classification. Proceed to the next step by clicking Next.

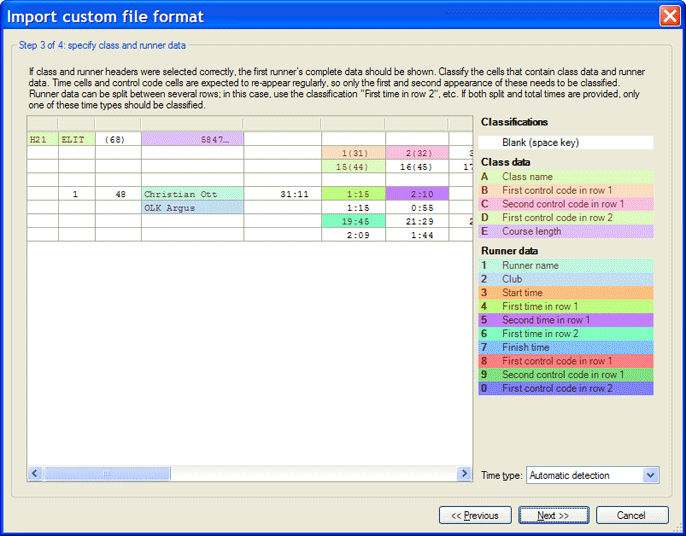
Step 3: enter class and runner data
If you have done the first two steps correctly, then information up to and including the first runner should now be shown. If more runners or no runners at all are shown, then you need to go back to the previous step and redo the way the header was created.
In this case you will classify the actual information on class and runner levels. Classification is done with the help of the colour-coding that is shown on the right. Classify a cell by clicking on it and then pressing the key that corresponds to the cell's classification (for example, A for class name). The cell is then coloured with the colour of the corresponding classification.
In this example, class name (two cells), course length and control code are classified on the class level. On the runner level, the runner's name, club and times are classified. For control codes and times that appear in multiple columns, both the first and second appearance of each has to be colour-coded. The following appearances are then automatically identified using this information. If control codes or times appear in several rows, then the first appearance on the second row also needs to be colour-coded. The classification Final time should only be used if the final time is not found with among the other times.
For split times, it is important that you colour-code either split times or total times, but not both if both are listed. In most cases, you can choose Automatic recognition in the drop-down box Time type, but there may be situations when you have to select one of Split times, Total times or Passing times.
Classification of control codes can be done either on class or runner level. The level you should choose depends on whether the code numbers are only provided in the class' title row or for each runner.
Proceed to the next step by clicking Next.
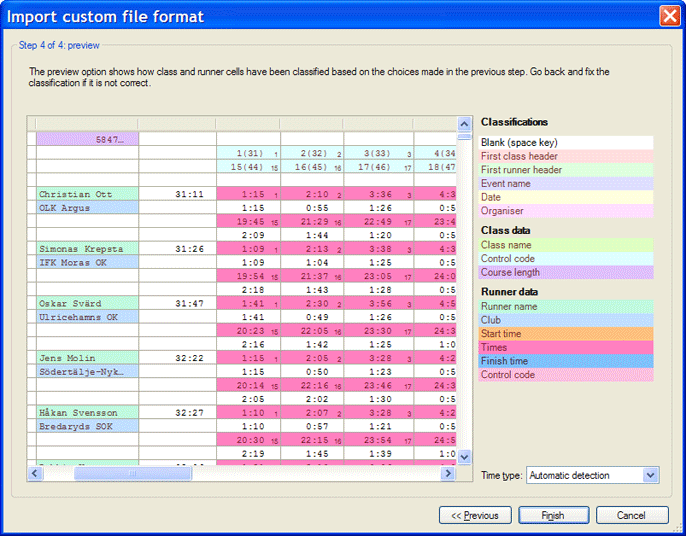
Step 4: preview
Here you can see all the class and runner cells that have been classified based on the choices you made in the previous steps. Control code cells and time cells are numbered in order. Browse through the entire table and check that classification has been done the way you intended.
If everything looks ok, click on Complete. If you have chosen to create a new event, you need to provide a file name for the split times to be saved to. When the import procedure is complete, the event is opened and the results tab is shown. If you need to edit or add event data, you can do that via Event > Event data from the menu.